Monday, October 17, 2016

How to debug facebook Access Token

In the previous articles we have seen “How to build your own facebook app?” and “How to create Facebook Access Token?”. Now in this article we will focus on how to debug facebook access token
There are two ways for debugging the facebook access token.
  1. You can directly use “Access Token Debugger”
  2. You can use “Access Token Tool” to debug access token of each individual facebook app
And we will look on “How to extend the validity of Facebook Access Token?”
Let begin one by one
1.“Access Token Debugger” – This is one of simplest method to debug any facebook access token.
debug-accesstoken-2016-10-17-18-40-11
    • Enter your access token and click on the debug button and it will show you all the statstics of you access token
    • There one more ways by which you can directly append “Accesstoken” at the end of URL and it will debug it. For example “https://developers.facebook.com/tools/debug/accesstoken?q=YOUR_ACCESS_TOKEN&version=v2.8”
2.“Access Token Tool” – If you have created multiple facebook app on your developers account than you can follow this step to debug the access token of each individual facebook app.
8.Debug-access-token
    • Now go down the screen and click on “Access Token Tool”
9.Debug-access-token
    • Now you can see all the facebook app which you have created previously on this page. Just find the app which you have created and click on the “Debug” button located in front of Access Token.
10.Debug-access-token
    • Once you will click on the “Debug” button you will redirected to “Access Token Debugger” screen.
debug-accesstoken-2016-10-17-18-40-11

How to extend the validity of Access Token?


After the facebook has upgraded its UI of Access Token debugger, we can now easiy just go and click on the “Extend Access Token” button located just below the “Access Token Debugger” screen.And you are go to go with extended Access Token.
Hope you have liked this article. Please feel free to drop your comments.

Friday, October 14, 2016

Create Facebook Access Token

Facebook provides “Access Token Tool” facility which can be used to generate access token for all the “Facebook App” which you have created.
“Access Token Tool” can be used for the following purpose : -
  1. Getting the new “Access Token”
  2. Debugging the “Access Token” (Here debugging term means checking the expiry of token, validity of token, scopes)
  3. Extend Access Token
We will take one step at a time. Let’s have look on our first point -
1. Getting the new “Access Token: – In our previous post we have seen “How to build your own facebook page” and created a app called “NewDemoApp”. Now here in this article we will create access token for the App “NewDemoApp”.
  • First step is we need to login to “https://developers.facebook.com”.
  • Once you logged-in into the facebook developer’s account goto “Tools & Support”.
screenshot-developers.facebook.com-2016-10-14-20-00-28
  • After clicking on the “Tools & Support” further down the screen you can see a link for “Access Token Tool”, please click on the link.
screenshot-developers.facebook.com-2016-10-14-21-06-41
  • Once you click on the “Access Token Tool” it will redirect you to new page and there you can find your facebook app “NewDemoApp” which you have created previously.
screenshot-developers.facebook.com-2016-10-14-21-08-16
  • Now you are alomost ready to create the access token for your app, just click on the link “need to grant permissions”
screenshot-{domain}-{date}-{time}
  • A pop-up message will appear on the screen with caption “Access Token created”
screenshot-developers.facebook.com-2016-10-14-21-14-53
  • Just click on continue and your access token is now ready. Please have a look the screencast below (Actual token is blurred due to security reason)
before-access-token-generation
after-token-generation
Conclusion : -
  1. In this article we have seen how to use “Access Token tool”
  2. Following the above steps you can generate the “Access Token” for your app
In the next article we will focus on “How to debug the Access Token?” and “How to Extend the Access Token Validity?”
Click on the below link for debugging and Exteding the access token validity

Build your own facebook app

Objective : – In this article we will have look on the new changes which facebook has made for the “Facebook GRAPH API”.
In this article we will have look on the detail steps which we need to follow to create “Facebook App” for website.
Steps: -
image
  • Click on the option “My Apps” and than select option “Add a New App”
image
  • A pop-up will appear on the screen on the pop-up you need to mention “Display Name”, “Contact Email” and choose suitable “Category”.
image
  • Once you “Create App” you will be redirected to “App Dhashboard”. Please have look on the below screen
image
  • Next important step would be to find the “App ID” and “App Secret”. To find those details just click on the “Dashboard” link below your app name e.g. “NewDemoApp”.
image
  • Next step would be to make your facebook app public to people, so that everyone can use your facebook app. To make the app public just click onto the link “App Review” and enable button located under “Make NewDemoApp public?”
image
image
Now you facebook application is ready with v2.8 version.
Conclusion:-
  1. Following the above steps you are now familiar with the “http://developers.facebook.com”
  2. After reading this article, now you can create your own facebook app with APP ID, App Secret.
Click Here: - How to create facebook access token?

Monday, October 10, 2016

Hibernate show sql with parameter values

In this article i will show you "How to log the SQL with parameters in Hibernate?"

As we know Hibernate is ORM framework which is being used at persistence layer. If you are a developer and you are Woking on development environment than i guess you faced a challenge to debug the SQL statement. 


Hibernate gives us a feature to show sql in the logs 


But the above feature doesn't let see the parameters which you are passing into your SQL statement. 


Hibernate provides 2 category and levels to execute the SQL parameters and show their bind parameters.


1. Use org.hibernate.SQL as debug

2. org.hibernate.type.descriptor.sql as trace

Here is the code snippet of log4j : - 


Please have look on the logs where you can see the actual parameters are being printed 


Employee entity used in the code : - 


Main class : - 


Summary :-


So using "log4j.logger.org.hibernate.SQL=debug" and "log4j.logger.org.hibernate.type.descriptor.sql=trace" we can easily log SQL parameters. With these features it is really easy to trouble shoot or debug the issue on development environment. But always remember it is always being advisable in the development or sand box environment. Please do not use this features on production environment because it will generate a lot of unnecessary logs and may creak disk space issue in the long run.

Wednesday, October 5, 2016

Unsupported major.minor version 52.0 Error in Java

Error: - Unsupported major.minor version 52.0 Error in Java

Issue: - This kind of issue comes when you have compiled the code using "Java 1.8" and trying to run it on lower version of JRE e.g. 1.7, 1.6


Troubleshoot: - 


  • Check the Java version: - Go to command prompt and type echo %JAVA_HOME%


  • Update “JAVA_HOME” path to “Java 1.8”
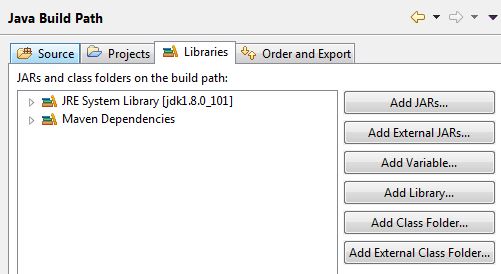
  • In case if you are working on eclipse than first check the “Project -->Properties-->Java Build Path -->Library”. It should have jdk1.8 included in the library

  • The next thing you should check while working in eclipse is the “Java Compiler”. Goto “Project-->Properties-->Java Compiler” and then select “Enable Project specific Setting”. Set JDK compliance to “1.7”

Thursday, December 24, 2015

Hibernate 5 Maven example

Hello!

Here in this post we will be looking into the basic setup of "Hibernate 5".
Hibernate 5 is being recently released to explore its feature we started setting up work space and the desired libraries needed for "Hibernate 5".

Here in this post we will be using
  1. Eclipse Mars.1 Release (4.5.1)
  2. Maven
  3. JDK 1.8
  4. Hibernate 5
  5. MySQL
You can also download/clone the complete workspace from GitHub : - https://github.com/rahulwagh/hibernate5.git

If you are not able to clone the repository than download the complete workspace and import in eclipse using following instruction 

File - > Import - > General - > Existing project into workspace


Maven Dependencies for Hibernate 5 

  
   org.hibernate
   hibernate-core
   5.0.2.Final
  
  
   mysql
   mysql-connector-java
   5.1.37
  
Here in this post we will try to insert an employee entry into the "employee" table which we have created.
Next step is to create an "Employee" @Entity

@Employee
package com.hibernate.tutorial.entity;

import javax.persistence.Column;
import javax.persistence.Entity;
import javax.persistence.Id;
import javax.persistence.Table;

@Entity
@Table(name = "employee")
public class Employee {

 @Id
 @Column(name = "id")
 Long id;

 @Column(name="employee_name")
 String employeeName;

 @Column(name="employee_address")
 String employeeAddress;

 public Employee(Long id, String employeeName, String employeeAddress) {
  this.id = id;
  this.employeeName = employeeName;
  this.employeeAddress = employeeAddress;
 }

 public Employee() {

 }

 public Long getId() {
  return id;
 }

 public void setId(Long id) {
  this.id = id;
 }

 public String getEmployeeName() {
  return employeeName;
 }

 public void setEmployeeName(String employeeName) {
  this.employeeName = employeeName;
 }

 public String getEmployeeAddress() {
  return employeeAddress;
 }

 public void setEmployeeAddress(String employeeAddress) {
  this.employeeAddress = employeeAddress;
 }

}

Next we need to write a code to insert a record into the table. Refer to following code where we have created following instances

  1. SessionFactory 
  2. Session
  3. Transaction
package com.hibernate.tutorial.mainclass;

import org.hibernate.Session;
import org.hibernate.SessionFactory;
import org.hibernate.Transaction;
import org.hibernate.cfg.Configuration;

import com.hibernate.tutorial.entity.Employee;

public class Hibernate5InsertTest {

 public static void main(String[] args) {
  SessionFactory sessionFactory;
  sessionFactory = new Configuration().configure().buildSessionFactory();

  Session session = sessionFactory.openSession();

  Transaction tx = session.beginTransaction();

  Employee emp = new Employee();
  emp.setId(new Long(1));
  emp.setEmployeeName("Rahul Wagh");
  emp.setEmployeeAddress("Indore, India");
  session.save(emp);
  tx.commit();
  session.close();
 }
}


SQL Script for "employee" table  : -

CREATE TABLE employee(
id INT NOT NULL AUTO_INCREMENT,
employee_name VARCHAR(100) NOT NULL,
employee_address VARCHAR(40) NOT NULL,
 PRIMARY KEY ( id));
Hope this article will help you to setup your Hibernate 5 Workspace.

For any issue please post your comments and leave your feedback

Monday, September 7, 2015

Hadoop File Already Exists Exception : org.apache.hadoop.mapred.FileAlreadyExistsException


Hadoop File Already Exists Exception


org.apache.hadoop.mapred.FileAlreadyExistsException


Hello folks!
Aim behind writing this article is to make developers aware about the issue which they might face while developing the MapReduce application. Well the above error "org.apache.hadoop.mapred.FileAlreadyExistsException" is one of the most basic exception which every beginner face while writing their first map reduce program.

Exception in thread "main" org.apache.hadoop.mapred.FileAlreadyExistsException: Output directory hdfs://localhost:9000/home/facebook/crawler-output already exists
    at org.apache.hadoop.mapreduce.lib.output.FileOutputFormat.checkOutputSpecs(FileOutputFormat.java:146)
    at org.apache.hadoop.mapreduce.JobSubmitter.checkSpecs(JobSubmitter.java:269)
    at org.apache.hadoop.mapreduce.JobSubmitter.submitJobInternal(JobSubmitter.java:142)
    at org.apache.hadoop.mapreduce.Job$10.run(Job.java:1290)
    at org.apache.hadoop.mapreduce.Job$10.run(Job.java:1287)
    at java.security.AccessController.doPrivileged(Native Method)
    at javax.security.auth.Subject.doAs(Subject.java:415)
    at org.apache.hadoop.security.UserGroupInformation.doAs(UserGroupInformation.java:1657)
    at org.apache.hadoop.mapreduce.Job.submit(Job.java:1287)
    at org.apache.hadoop.mapreduce.Job.waitForCompletion(Job.java:1308)
    at com.wagh.wordcountjob.WordCount.main(WordCount.java:68)
    at sun.reflect.NativeMethodAccessorImpl.invoke0(Native Method)
    at sun.reflect.NativeMethodAccessorImpl.invoke(NativeMethodAccessorImpl.java:57)
    at sun.reflect.DelegatingMethodAccessorImpl.invoke(DelegatingMethodAccessorImpl.java:43)
    at java.lang.reflect.Method.invoke(Method.java:606)
    at org.apache.hadoop.util.RunJar.run(RunJar.java:221)
    at org.apache.hadoop.util.RunJar.main(RunJar.java:136)

Let's start from scratch.

To run a map reduce job you have to write a command similar to below command

 $hadoop jar {name_of_the_jar_file.jar} {package_name_of_jar} {hdfs_file_path_on_which_you_want_to_perform_map_reduce} {output_directory_path}

Example : - hadoop jar facebookCrawler.jar com.wagh.wordcountjob.WordCount /home/facebook/facebook-cocacola-page.txt /home/facebook/crawler-output

 Just pay attention on the {output_directory_path} i.e. /home/facebook/crawler-output . If you have already created this directory structure in your HDFS than Hadoop EcoSystem will throw the exception "org.apache.hadoop.mapred.FileAlreadyExistsException".

 Solution: - Always specify the output directory name at run time(i.e Hadoop will create the directory automatically for you. You need not to worry about the output directory creation).

 As mentioned in the above example the same command can be run in following manner - "hadoop jar facebookCrawler.jar com.wagh.wordcountjob.WordCount /home/facebook/facebook-cocacola-page.txt /home/facebook/crawler-output-1"

 So output directory {crawler-output-1} will be created at runtime by Hadoop eco system.